Mastering Sunflower 3D SVG Multilayer Cut Files for Professional Wall Art
Creating dimensional wall art has become a cornerstone of modern home decor, blending the precision of digital design with the tactile warmth of physical materials. At the heart of this trend is the Sunflower 3D SVG Multilayer Cut Files collection, a versatile resource designed for crafters who want to elevate their projects beyond flat, two-dimensional cuts. Whether you are using a Cricut, Silhouette, Glowforge, or a professional CNC router, these files offer a pathway to stunning results. However, the difference between a amateurish outcome and a gallery-worthy piece often lies in understanding the technical nuances of multilayer designs.
This guide explores how to maximize the potential of these files while avoiding common pitfalls that can waste materials and time. By focusing on proper scaling, material selection, and layer management, you can ensure your sunflower mandala projects are both beautiful and structurally sound.
Understanding the Design Structure
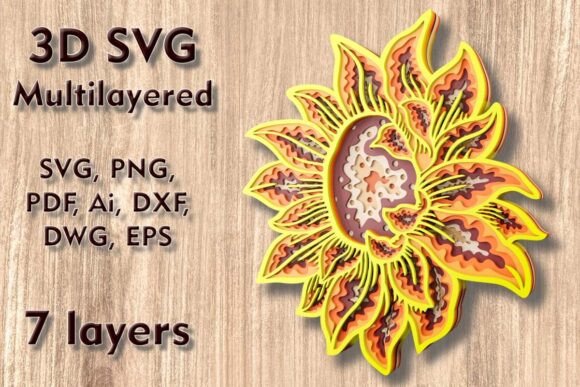
The Sunflower Mandala SVG is not just a single image; it is a complex assembly of seven distinct layers. Each layer contributes to the depth and visual interest of the final piece. The default dimensions are set at 250 mm height by 225 mm width (approximately 9.8 x 8.9 inches). This size is ideal for medium-sized wall hangings, desk ornaments, or intricate greeting cards.
What makes this design particularly valuable is its adaptability. The files are provided in a comprehensive ZIP folder containing SVG, layered SVG, DXF, DWG, EPS, AI, PNG, and PDF formats. This variety ensures compatibility with virtually any cutting software, from Design Space to LightBurn. However, having access to multiple formats does not guarantee success if the underlying geometry is misunderstood.
Common Mistake: Improper Scaling and Thin Elements
One of the most frequent errors beginners make when working with multilayer SVGs is aggressive downscaling. While the design can easily be increased in size for larger statement pieces, reducing it requires caution. The sunflower design features delicate petals and intricate mandala details. When you shrink the overall dimensions, these thin elements become proportionally smaller and more fragile.
The Consequence: If you reduce the design below a certain threshold, the cutting blade or laser beam may tear through the material rather than cutting cleanly. In plywood or cardstock, this leads to broken petals and ruined layers. In acrylic, it can cause melting or incomplete cuts due to the kerf width of the laser.
The Solution: Always preview your design at the intended size before cutting. If you must scale down, test cut a single intricate layer first. For best results, stick close to the original 9.8 x 8.9-inch dimensions or scale up. If you need a smaller version, consider simplifying the design by removing the innermost, most delicate layers to maintain structural integrity.
Material Selection: Matching Medium to Machine
The versatility of the Sunflower 3D SVG Multilayer Cutting Files allows for use with plywood, paper, cardstock, MDF, wood, acrylic, cardboard, and even aluminum. However, treating all these materials the same way is a recipe for frustration. Each material interacts differently with cutting tools and adhesives.
- Plywood and Wood: Ideal for laser cutters and CNC routers. Ensure your veneer is free of knots in critical areas. Sanding between layers is often necessary for a smooth finish.
- Cardstock and Paper: Best for Cricut and Silhouette users. Use a brayer to secure the paper to the mat to prevent shifting during the cut.
- Acrylic: Requires precise laser settings to avoid flame polishing edges too much, which can alter the fit of the layers.
- Aluminum: Typically requires a specialized CNC setup or fiber laser, not standard diode lasers.
Overlooked Detail: Many crafters forget to account for material thickness when stacking seven layers. Using thick cardboard for all layers can result in a bulky, heavy piece that is difficult to mount. A better approach is to mix materials or use thinner substrates for the upper, more detailed layers to keep the profile sleek.
Layer Management and Assembly Errors
With seven separate layers, organization is key. A common misunderstanding is that the layers will automatically align perfectly without guidance. In reality, slight variations in cutting accuracy or material stretch can lead to misalignment.
The Fix: Use registration marks or a consistent alignment strategy. Many crafters find it helpful to number the back of each layer immediately after cutting. Additionally, when assembling, start from the base layer and work your way up, checking alignment from multiple angles. Use a slow-drying adhesive like PVA glue for wood and paper, as it allows you to adjust the position slightly before it sets. For acrylic, use clear epoxy or specialized plastic adhesives to maintain transparency and clarity.
File Format Confusion
Downloading the ZIP folder reveals a plethora of file types. Beginners often struggle to choose the right one. Using a PNG for a cutting machine, for example, will result in a raster image that cannot be easily separated into layers for 3D assembly. Similarly, opening a DXF file in a program that does not support it well can lead to lost nodes and broken paths.
Best Practice:
- Use SVG or Layered SVG for Cricut Design Space, Silhouette Studio (Business Edition), and Adobe Illustrator.
- Use DXF or DWG for AutoCAD or specific CNC software.
- Use PDF for manual reference or printing templates.
Enhancing Your Final Product
To truly unlock the magic of the season with these high-quality SVG files, consider the finish. Raw wood layers can look rustic, but painting or staining each layer before assembly adds depth and contrast. For paper crafts, using textured cardstock can mimic the look of fabric or canvas.
Lighting also plays a crucial role in 3D wall art. Installing a small LED strip behind the mounted sunflower can cast dramatic shadows, highlighting the seven-layer depth. This transforms a simple craft project into an enchanting home decor feature that changes throughout the day.
Final Checks Before Cutting
Before you send your file to the machine, take a moment to review your setup. Check that all layers are visible and correctly ordered in your software. Verify that the cut lines are closed paths to prevent uneven edges. If you are using a laser cutter, ensure your focus is calibrated for the specific material thickness. For blade cutters, check that your blade is sharp; dull blades drag on intricate mandala designs, causing tears.
By approaching the Sunflower 3D SVG Multilayer Cut Files with a mindset of precision and preparation, you avoid the common frustrations that plague many DIY projects. Whether you are creating a gift for friends and family or building inventory for a small business, attention to detail ensures a professional, polished result every time.